Building Chrome Extension with ReactJs: Beginner’s Guide

What is a Chrome Extension?
Chrome Extensions are very powerful tools which get embedded in the web page and are able to manipulate what we see on the web. Adblocker is one popular example of extension which is used by most people that blocks advertisements from showing on the website. The best part about developing a chrome extension is that they are easy to build and use core web technologies like HTML, CSS, and Javascript.
Recently we at OYO Engineering & Data Science built a chrome extension-OYO Hotel Finder which helps users to find recommended hotels while they search for hotels around the web. The idea is pretty simple, figure out what location and date the user is looking for and show him results relevant for that search.
Setting up files

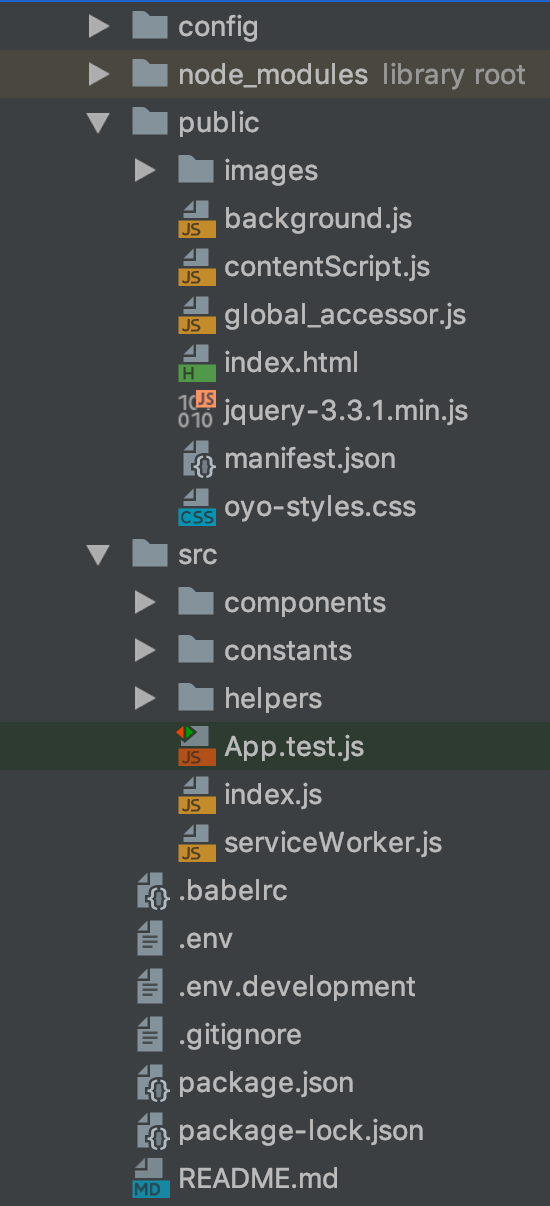
The file and folder structure would look similar if you have worked on React project before. It has a src folder which contains react related code, public folder contains some extension related code and some static resources.
Adding manifest.json
Every chrome extension requires a manifest file. It includes all the meta information about the extension. We will be using a popup, background script and content script in our extension which we will be declaring in our manifest file. We also have to declare permissions for what all chrome APIs we would be using in our extension. In my case, I have declared tabs permission because we would be using tab related information.
{
  "manifest_version": 2,

  "name": "OYO Hotel Finder",
  "description": "OYO Chrome Extension Hotel Finder",
  "version": "1.0.3",

  "browser_action": {
    "default_popup": "index.html",
    "default_title": "OYO Rooms Finder"
  },
  "background": {
    "scripts": ["background.js"]
  },
  "icons": {
    "16": "./images/oyo-logo.png",
    "48": "./images/oyo-logo.png",
    "128": "./images/oyo-logo.png"
  },
  "permissions": [
    "tabs"
  ],
  "content_scripts": [
    {
      "matches": ["http://*/*", "https://*/*"],
      "js": ["contentScript.js"]
    }
  ]
}
Content Script
These files run in the context of the webpage. This is helpful if we want to extract some information from the webpage. In our case, we will use it to get user search term and dates from DOM on the basis of which we show the recommendation to the user. In our manifest file, we also have to provide permission to sites where this script could run. In our case, we have declared it could run on all websites ["http://*/*", "https://*/*"].
Following is a sample code could be used to get dom element value for a selector:
function getDataFromDOM(selector) {
  var domNode = document.querySelector(selector);
  if (domNode) {
    var content = document.querySelector(selector).textContent;
    if (content) {
      return content.trim();
    }
  }
  return undefined;
}
Background Script
It is needed to make use of Chrome APIs like checking if the user has switched tab, opened a new tab or any other event has been triggered on the browser. These scripts remain active until an event is firing for which it is listening to or if it is making some server API calls.
chrome.runtime.onInstalled.addListener(function(details){
    // This gets once the extension is installed on browser
});
chrome.tabs.onUpdated.addListener(function(tabId, changeInfo, tab) {
    // Get called when page URL is updated or refreshed
});// To dynamically change extension icon
chrome.browserAction.setIcon({
  path: {
    "16": "/images/logo.png",
    "48": "/images/logo.png",
    "128": "/images/logo.png",
  }
});
Interaction between Content Script and Background
Since only content-script can access DOM elements it is important that our popup and background are able to interact with it to send and retrieve data. For this purpose, the only way of interaction is using PostMessage and chrome’s runtime API.
In our case when the user clicks on the popup icon we would want to extract the user’s search date and location, so the content script will be sending a postmessage to the popup upon which we can get a recommendation from the server.
Here is the sample code where popup gets the config from the content script and passes the config to its child components.
/src/components/index.js (Popup for extension)
import React, { Component } from 'react';

import Home from "./Home";
import HotelsParent from "./HotelsParent";

import './styles.css';

class App extends Component {

  constructor(props) {
    super(props);
    this.state = {
      configData : null,
    }
  }
In componentDidMount we will add an event listener which will listen for any message coming from content script.
componentDidMount() {
  window.chrome.runtime.onMessage.addListener((message, sender, sendResponse) => {
      if (message.type === "OYO_PLUGIN_EVALUATED_CONFIG") {
        this.setState({
          configData: message.configData
        });
      }
    });
Finally, we would be sending this config data to our child component which could make a server call and fetch recommendation.
render() {
    if (!this.state.configData) {
      return (
        <HomeComponent />
      )
    }
    return <HotelsList configData={this.state.configData}/>;
  }
}

export default App;
Content Script will make use of sendMessage to send the data.
public/content_script.js
// This will send the #someSelector value to popup
chrome.runtime.sendMessage({
    type: 'OYO_PLUGIN_EVALUATED_CONFIG',
    configData: getDataFromDOM('#someSelector')
});
In this way, our popup will get the data from DOM via content script using post messages. Similarly, we could send data from background script to popup or content script using chrome.tabs.sendMessage();
Just like any other react project, we would need an entry point for the application, our’s entry point would be index.html which we declared in manifest.json file.
index.html
<!DOCTYPE html>
<html lang="en">
<head>
    <meta charset="utf-8">
    <meta name="viewport" content="width=device-width, initial-scale=1, shrink-to-fit=no">
    <meta name="theme-color" content="#000000">
    <link rel="stylesheet" href="oyo-styles.css">
    <title>Oyo Finder</title>
</head>
<body>
<noscript>
    You need to enable JavaScript to run this app.
</noscript>
<div id="root"></div>
</body>
</html>
Once we have put all our pieces into place, let’s build and deploy our chrome extension.
Build and Deploy
Let’s use a basic webpack configuration to build our project.
module.exports = () => {
 return {
   mode: 'production',
   output: {
     publicPath: '/',
     filename: "[name].[contenthash].js"
   },
   module: {
     rules: [
       {
         test: /\.(js|jsx)$/,
         exclude: /node_modules/,
         use: {
           loader: "babel-loader"
         }
       }]
};
This should build a dist folder in your working directory with bundled javascript and other static resources we have used which would be used for deployment.
webpack --config config/webpack.config.prod.js --mode productionTo install this extension in chrome visit, chrome://extensions in your chrome browser and enable “Developer Mode” from the rightmost corner and then click on “Load Unpacked”. Select /dist folder from your working directory.
This should install your extension and you must see the icon displayed in your Google Chrome toolbar. So now you have officially created your first extension using React.
Final Words
There is a lot a chrome extension could do which could improve user experience vastly. In other words, one could make their own personalized browser using extensions.
Lastly, don’t forget to checkout OYO Hotel Finder extension for best hotel recommendations at best prices.
Would love to hear reviews about it :)
Cheers!!
Reference:
